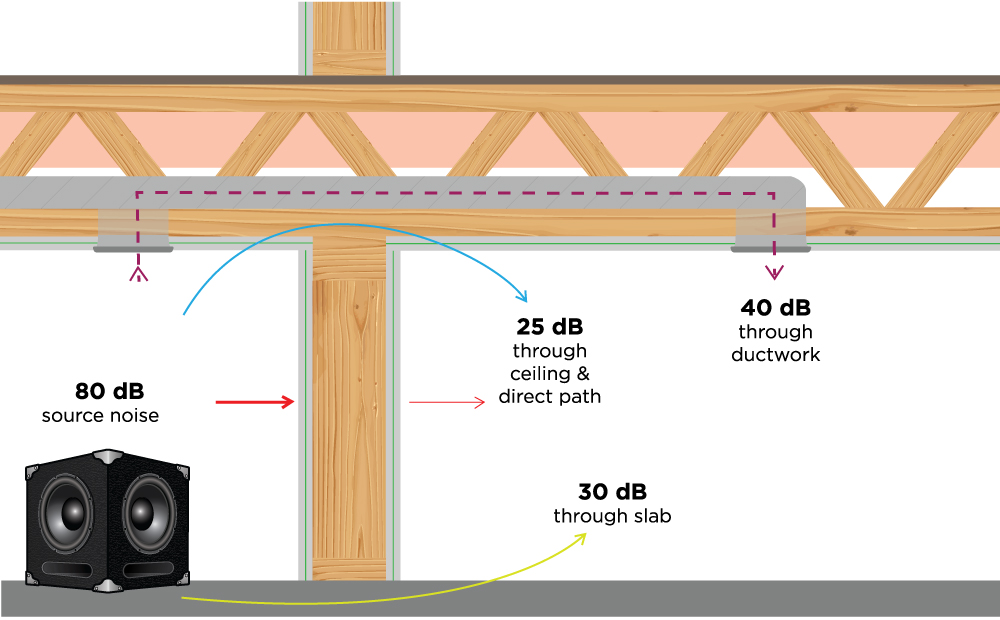
Noise finds all sorts of pathways to travel through, some direct and others indirect. It’s those indirect pathways that are referred to as flanking noise, and it’s an important concept to consider when renovating or remodeling your home or office…
The diagram above illustrates how noise travels from one room to another. Direct noise is represented by the red arrows – the straight line from the noise source through the wall to the adjoining room. But even more noise enters the adjoining room through indirect pathways: floors, air pockets in ceilings, ductwork, etc. To reduce the amount of noise traveling from one room to another, consider creating a special design just for that room. For example, you could use Green Glue Compound or mass loaded vinyl between 2 sheets of drywall, or decouple with our sound isolation clip or better yet…BOTH!!
If you are a musician or in the voice recording industry, you may need a superior level of soundproofing. In this scenario, consider designing a “room within a room.” This is where a double row of studs are combined with separate ceiling joists, effectively eliminating practically all mechanical connections between the room and the rest of the structure. Please ensure if you are doing this to remove the existing layer of drywall on the ceiling and walls, or else you will end up with what we call the “Triple Leaf Effect” and that would be a big waste of your money!
Here are some other tips on how you can keep flanking noise from ruining your home renovation plan:
- Get Serious About Doors. Doors are often the weakest link in a soundproofing plan. Even if doors do not directly connect two rooms, noise can travel through doors into hallways and into adjoining rooms. Depending on your budget, you can create an oasis of quiet in your home by focusing on your doors. You could soundproof a room with 20 layers of drywall and Green Glue between each, but if you leave a 1/4″ gap under a door, 60% of sound will still enter or escape that room. We recommend our automatic door sweep and neoprene door jamb seals to help with that.
- Go Heavy. Be sure to use solid-core interior doors with exterior jams that have been soundproofed with effective seals. The heavier the door, the better.
- Add Weight and Damping. Adding Green Glue Compound and a layer of MDF or mass loaded vinyl to the door can boost sound isolation performance.
- Communicating Doors. If a door connects two rooms directly, two communicating doors typically work much better than even the best single door. Communicating doors form an airlock that isolates noise effectively. It really depends on the quality of the doors. A single good door is going to be better than two poorly sealed doors.
- Plugging Up. Another weak link in a sound isolation system is the electrical socket. It offers a pathway for noise to travel; be sure to install outlets in separate stud cavities (never back to back). Outlets should be sealed properly, and consider adding some mass to the outlet like our putty pads. You also need to worry about what type of lighting is going onto/into the ceiling. If you are using pot lights, we recommend using our pot-light backer boxes. If you using any other type lighting that creates a penetration in the ceiling, you can help seal that penetration with either putty pads or Green Glue Sealant. Lastly home theatres and in-ceiling speakers have become quite popular over the last 10 years, and while they save space and sound great, almost 40% of the sound these speakers make go into the ceiling! Even when the speakers aren’t playing music, that is still a 8″-12″ hole in your ceiling with little to no soundproofing involved! We have speaker backer boxes for in ceiling or even in-wall speakers to “plug up” those holes! No point in spending thousands of dollars to soundproof a wall/ceiling just to leave all these holes.
- Deconstruct Your Ducts. Noise traveling through ductwork can be very difficult to isolate. Some tips to consider include the following:
- Be sure to use insulated ductwork. Lined ductwork absorbs sound, but the lining must be inside the ductwork to be effective. If your ductwork is already installed you can try installing our in-line duct silencers.
- Make the ductwork pathways long and complex. By forcing noise to travel through complex pathways, more of it can be absorbed by the duct insulation.
- Use flexible duct in areas where the duct is not exposed to direct sound.
- If ductwork is exposed to sound, use a damping compound or wrap the ducts with mass loaded vinyl to prevent direct exposure.
- Isolate Your Walls. If you don’t want to build a room inside of a room, or maybe your at the construction stage of building a new home or office, you can decouple your walls with Geniemat-FIS flaking isolation product. This recycled rubber product is easy to install and reduces anywhere from 5-10 decibels of flanking sounds!
- Seal the Deal. You may be using the best soundproofing material available, but if there are air cracks between two rooms, noise will get through. Be sure to use acoustic sealant; a good choice is water-based, low-odor Green Glue soundproofing sealant. We always recommend leaving a 1/4″ gap around the perimeter of a wall or ceiling to allow it to “decouple” itself from adjoining walls/ceilings/floors and that too gets filled in with the Green Glue Sealant.
Following these steps when soundproofing or renovating your home or office will provide you with a serene and peaceful environment that you will enjoy for years to come! If you ever have a soundproofing question, or you are still unsure what to do to soundproof your home or office against flanking noise or any type of noise, give us a call, we are always here to help!
Share blog:
![]()
![]()
![]()
![]()
Sharing is caring!!